This lesson describes step-by-step how to connect to a MySQL database using PHP. It is a necessary step to enable your PHP script to read data out of your database. Otherwise WordPress could not read the content of your post and would only present an empty theme to your user. We are bridging the worlds of PHP and MySQL.
Required functions for PHP to interact with MySQL servers
If you want to provide content coming from a database, you will at least have to know the following functions:
- mysqli_connect($db_server, $db_user, $db_password, $db_name) — opens a connection to a database server (returns $db_connection)
- mysqli_query($db_connection, $sql_query_string) — sends a SQL statement to the DBS (returns $statement)
- mysqli_fetch_row($statement) — creates a result set with data coming from the DBS (returns $result)
- mysqli_insert_id($db_connection) — gets the last generated ID coming from an auto_increment attribute (returns $last_id)
- mysqli_error() — gives the error string coming from the DBS in case of an error (returns $error string)
- mysqli_num_fields($statement) — gets the column count of a statement
There are different scenarios of data readout we want to take a look at.
Database connection and simple data readout
The following code is an example on how to do a full PHP – database interaction roundtrip:
1 2 3 4 5 6 7 | <?php $server = "dbs.your-domain.com"; $user = "bob"; $password = "P4ssW0rD!"; $database = "wordpress"; $conn = mysqli_connect($server, $user, $password, $database); ?> |
The code above enables you to build a working database connection from your PHP script. However we have not read any data yet.
1 2 3 4 5 | <?php $stmt = mysqli_query($conn, "SELECT TEXT FROM TEST") or die ( mysql_error() ); $row = mysqli_fetch_row($stmt); echo $row[0]; // gives the first item of TEXT in TEST ?> |
The last two lines will allow data readout, but only for the first row of one attribute.
Reading one attribute and all rows of a table using WHILE loop
If you wanted to read all rows of table TEST for attribute TEXT you’d have to use a WHILE loop as discussed earlier:
1 2 3 4 5 6 | <?php $stmt = mysqli_query($conn, "SELECT TEXT FROM TEST") or die ( mysql_error() ); while ($row = mysqli_fetch_row($stmt)) { echo $row[0]; // gives the current item of TEXT in TEST } ?> |
The WHILE loop above enables you to echo all values of attribute TEXT in TEST.
Reading several attributes and all rows of a table using WHILE and FOR loops
If you wanted to read all rows of table TEST for more than one attribute you can do the following:
1 2 3 4 5 6 7 8 9 | <?php $stmt = mysqli_query($conn, "SELECT ID, TEXT FROM TEST") or die ( mysql_error() ); $column_count = mysqli_num_fields($stmt); while ($row = mysqli_fetch_row($stmt)) { for ($j = 0; $j < $column_count; $j++) { echo $row[$j]; // gives the current item of the current attribute in TEST } } ?> |
You notice that we put a FOR loop inside the WHILE loop which counts through every column (attribute) of the table we are fetching.
The advantage of the code above is that you can re-use it for any table and any attribute you like.
I hope this part of our PHP MySQL tutorial article helps you in getting started with understanding the bridge between PHP and MySQL. We will now focus on actual data readouts, by using a common problem: a login script with database user data.
The next lessons:
This lesson will give you a step by step guide on how to build a login script using PHP and MySQL. You will get a better understanding how a content management system like WordPress communicates with a database, selects data from it, and processes that data to give final HTML code to a user’s browser.
Database prerequisites for user handling
First of all we are going to need a database table carrying our login information as a reference. We could use the following table to do that:
1 2 3 4 5 | create table user ( id int(20) primary key auto_increment, username varchar(120) unique, password varchar(120) ) |
The attribute “id” is just to have a fast integer based way of sorting and processing our user information. It is our primary key and will be incremented automatically by the DBMS if a new row is inserted.
The next attribute “username” is a text column carrying our unique username.
The last attribute “password” is also a text column carrying the password for each user, whereas that does not have to be unique. Furthermore we sure want to place a hash value here instead of our clear text password, but that will be done later using PHP.
For now, that table is in charge of holding our login information. We will insert a few users:
1 2 3 | insert into user values (null, 'bob', 'secret'); insert into user values (null, 'paul', 'god'); insert into user values (null, 'sandra', 'flower'); |
We notice that we will just use clear text passwords for now, just to make it easier to understand how stuff works. I will cover a more secure way of storing password information shortly.
Building a HTML user login interface
As discussed within this article we will have to construct a little login form which deals with POST parameters. We could use the following code within a file “login-form.html”:
1 2 3 4 5 6 7 8 9 | <html><head><title>Login form</title></head> <body> <form action="user-login-processing.php" method="POST" enctype="text/plain"> Username: <input type="text" name="username" value="" /><br /> Password: <input type="password" name="password" value="" /><br /> <button type="submit" value="Login">Login</button> </form> </body> </html> |
That’s all we need for a basic HTML login form. The user is asked for his username and his password. Then when he clicks the Login button, the form and its parameters will get forwarded to the PHP script “user-login-processing.php” using POST method.
Connecting to our user database
Now let’s see what our script “user-login-processing.php” needs to do.
As discussed within this article we will first have to connect to our database. We do that as follows:
1 2 3 4 5 6 7 8 | <?php $server = "dbs.your-domain.com"; $user = "bob"; $password = "P4ssW0rD!"; $database = "wordpress"; mysql_connect($server, $user, $password); mysql_select_db($database); ?> |
Once connected, we are able to process our parameters.
Checking user input against user database
The first thing to do is to grab our parameters:
1 2 3 4 | <?php $username = @$_POST["username"]; $password = @$_POST["password"]; ?> |
The code above stores our user input values inside variables having the same name as our parameters do. That’s just to make things as easy as possible. The @-sign is to ignore missing parameter values.
As soon as we’re both connected and parameter-ready, we can ask our database if a user exists with the credentials provided within the login form.
What is going on in the code below is discussed within this article. The important thing here, however, is the fact that we’re asking the database if there is a row for two specific conditions — both username and password values must be present.
Since our username is unique, there won’t ever be a second data record. Still there could be no row at all if either the username or the password is wrong. We’re looking for a perfect match for those two attribute values.
1 2 3 4 5 6 7 8 9 | <?php $sql="select id from user where username = '$username' and password = '$password'"; $stmt = mysql_query($sql) or die ( mysql_error() ); //$row = mysql_fetch_row($stmt); //if we wanted to test our statement //echo $row[0]; //if we wanted to test our statement $num_rows = mysql_num_rows($stmt); if ($num_rows == 1) { echo "You are logged in"; } else { header('Location: login-form.html'); } ?> |
The attribute that is actually selected is, in our case, “id”. That is irrelevant and just serves the purpose to actually have a result in case of a found match.
If there is a match, you will see “You are logged in”. If there is no match, the script will head back to the login form.
The complete login script in a nutshell
This is the full blown version of the code discussed above.
The HTML login formular “login-form.html”:
1 2 3 4 5 6 7 8 9 | <html><head><title>Login form</title></head> <body> <form action="user-login-processing.php" method="POST" enctype="text/plain"> Username: <input type="text" name="username" value="" /><br /> Password: <input type="password" name="password" value="" /><br /> <button type="submit" value="Login">Login</button> </form> </body> </html> |
The PHP target script “user-login-processing.php” used for login:
<?php // parameter grabbing $username = @$_POST["username"]; $password = @$_POST["password"]; // database connection $server = "dbs.your-domain.com"; $user = "bob"; $password = "P4ssW0rD!"; $database = "wordpress"; mysql_connect($server, $user, $password); mysql_select_db($database); // initiate login procedure $sql="select id from user where username = '$username' and password = '$password'"; $stmt = mysql_query($sql) or die ( mysql_error() ); //$row = mysql_fetch_row($stmt); //if we wanted to test our statement //echo $row[0]; //if we wanted to test our statement $num_rows = mysql_num_rows($stmt); // login successfull? if ($num_rows == 1) { echo "You are logged in"; // do your stuff } else { header('Location: login-form.html'); } ?> |
A great video tutorial serving the same purpose as this blog article with just slightly different code follows right here:
https://www.youtube.com/watch?v=5XpBzLVHkPY
I hope this helps you in getting started. Enjoy! 😉
Thoughts on information security
The code above is not the most secure 🙂 You may want to fight SQL injection and other sorts of manipulation. I’m currently thinking about an entire section on PHP and MySQL security within this blog.
For now, please at least use the following procedure to not store your passwords as clear text within your database.
The following code will produce a hashed version of “asdf” as a possible (insecure) password.
1 2 3 | <?php echo sha1("asdf"); ?> |
You can use sha1($password) within the code snippets above to hash the user’s password input right after grabbing it as a parameter value and right before sending it to the database. That procedure will result in the same answer — to either have a username/password match or to have none.
However it requires you to store hashed passwords within the database in the first place. You can use the echo sha1() code above to look up your desired hash value.
Furthermore you may want to escape your parameters, etc. — just take a look at the video above for a little more security.
WordPress implications
Even though we use a common problem to demonstrate how data is being read out of a database, the basic lesson you need to understand is this: First you need to make a database connection using your PHP script. Then you use that connection to ask the database for certain information. Finally you use the data obtained from the database to process it further, for example by echoing that data or by changing the user’s heading – like in our login example.
That roundtrip is what we talked about in the very beginning. All that is left for a user’s visit cycle to complete is to return that result as HTML that a browser can understand, while supporting functionality to request changes to the database. That is what we will cover in our final lesson.
The next lesson:
This lesson gives a step-by-step description on how to dynamically read data coming from a MySQL database and how to both visualize and edit that data using HTML table and form markup. This brings everything together that we have discussed in previous lessons. It is also what WordPress does to provide the full technical cycle of a user’s visit from his initial request to receiving the final HTML result in his browser.
How our data management markup will look like
Let’s assume we want to build a Comic management database application handling data like this:

If a user clicks “Delete” the entry will be removed from the database accordingly.
If a user clicks “Edit” he will see a form like this:

Finally, if a user clicks “Create new comic” he will see a form like this:
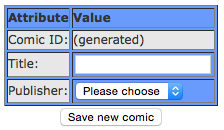
This article will cover everything technically necessary to develop what you see above. However I will not go into visual styles here.
Database prerequisites
Let’s take a look at the database tables we need to achieve this.
Database table COMIC
Let us assume that ID and Name are both direct attributes of a Comic, and Publisher is a foreign key ID of another table called Publishers.
| ID | Comic_Name | Publisher_ID |
|---|---|---|
| 7 | The Incredible Hulk | 0 |
| 9 | Superman | 1 |
Database table PUBLISHER
Then table Publisher will have to look like this:
| ID | Publisher_Name |
|---|---|
| 0 | Marvel |
| 1 | D.C. |
With those two tables present, what do we need to program?
Reading MySQL data using PHP
As discussed previously in this PHP MySQL tutorial, we can connect to the database and use the following code to read data coming from MySQL using PHP WHILE loop inside a content-start.php surrounded by header and footer as discussed previously:
<?php echo "<table>"; $stmt = mysql_query("SELECT ID, Comic_Name, Publisher_Name from COMIC, PUBLISHER where COMIC.Publisher_ID = PUBLISHER.ID order by COMIC.Title"); while ($row = mysql_fetch_row($stmt)) { echo "<tr>"; for ($j = 0; $j < 3; $j++) { // we're expecting three attributes echo "<td>".$row[$j]."</td>"; // gives the current item of the current attribute } echo " <td><a href="index.php?section=comic&function=edit&id=$row[0]">Edit</a></td>"; echo " <td><a href="index.php?section=comic&function=delete&id=$row[0]">Delete</a></td>"; echo "</tr>"; } echo "<table>"; echo "<a href="index.php?section=comic&function=new">Create new comic</a>"; ?> |
However there are a few things new here:
- We’re no longer simply echoing pure database information, but we’re using HTML table markup output. That output is generated by PHP whereas a table is opened up outside the WHILE loop, a table row tag is opened within each WHILE loop cycle and a table column tag is opened within each FOR loop cycle.
- We’re joining two database tables with one another using the SQL statement above.
- We’re extending the attribute columns by two additional columns carrying HTML links pointing to more magic.
Deleting MySQL data using PHP
If a user clicks “Delete”, we have to somehow send a SQL delete statement to the database.
The first step is already done. Looking at the code above, we see that the link with the anchor text “Delete” already possesses the ID of each comic to be deleted. That leaves us with the following tasks:
- Grabbing the transported ID
- Formulating and sending the right statement to the database
- Heading back to the previous page
Since the link says “index.php?section=comic&function=delete&id=$row[0]” we first need to remember where we are right now. I still assume that you’re using the navigational skeleton as described here. If that is the case, you already solved the problem of directing the user to the comic section, whereas a specific file is being loaded, let’s say content-comic.php.
Inside that file, we now have to grab an additional parameter called “function”, since we want to distinguish between creating, editing and removing comics. Secondly, we need to grab the transported ID. We do both as described within the inter-script parameter article:
<?php $function = $_GET["function"]; $comic_id = $_GET["id"]; if ($function == "delete") { $sql = "delete from COMIC where ID = $comic_id"; mysql_query($sql); header('Location: index.php?section=comic'); } ?> |
That was the easy part.
Editing MySQL data using PHP
Now things get a little more complex. While we can use the same mechanism as described above to grab the function “edit”, we have to do a little more stuff in order to give each user the opportunity to modify the information.
First of all, a user wants to see the current information, which makes it easier for him to change them 😉 That is why we’re selecting all information belonging to the current comic ID. Afterwards we’re printing that information either without text field (ID, unchangeable), inside a text field (text information like the comics title) or inside a dropdown menu (comic publisher, but with a pre-selection for the current publisher).
Additionally the current comics ID is held within a hidden field.
Study the code below which does exactly that:
<?php $function = $_GET["function"]; $comic_id = $_GET["id"]; if ($function == "edit") { echo "<form action='index.php?section=comic&function=edited' method='POST'>"; echo "<table>"; $stmt = mysql_query("select ID, Comic_Name, Publisher_ID, Publisher_Name from COMIC, PUBLISHER where COMIC.Publisher_ID = PUBLISHER.ID and COMIC.ID = $comid_id"); while ($row = mysql_fetch_row($stmt)) { echo "<tr>"; echo " <td>ID</td>"; echo " <td>".$row[0]."</td>"; // not changeable echo "</tr>"; echo "<tr>"; echo " <td>Title</td>"; echo " <td><input type='text' name='edited_comic_title' value='".$row[1]."'/></td>"; // changeable echo "</tr>"; echo "<tr>"; echo " <td>Publisher:</td>"; echo " <td><select name='edited_publisher_id' type='text' value=''/> <option value='$row[2]'>$row[3]</option>"; $sql = "select ID, Publisher_Name from PUBLISHER where ID not like $row[2] order by ID asc"; $stmt_inner = mysql_query($sql); $i = 0; while ($row_inner = mysql_fetch_row($stmt_inner)) { $j = 0; $ID_Publisher[$i] = $row[$j]; $j++; $Title_Publisher[$i] = $row[$j]; echo " <option value='$ID_Publisher[$i]'>$Title_Publisher[$i]</option>"; $i++; } echo " <td>"; echo "</tr>"; } echo "</table>"; echo "<input name='comic_id' value='$comic_id' type='hidden'/>"; echo "<input name='Save' value='Save' type='submit'/>"; echo "</form>"; } if ($function == "edited") { $edited_comic_title = $_POST["edited_comic_title"]; $edited_publisher_id = $_POST["edited_publisher_id"]; $comic_id = $_POST["comic_id"]; $sql = "update COMIC set Comic_Name = '$edited_comic_title', Publisher_ID = $edited_publisher_id where ID = $comic_id"; mysql_query($sql); header('Location: index.php?section=comic'); } ?> |
You notice that there is also a comparison for variable “function” against the string “edited”. The variable function carries that string when the form that held all previous input fields was submitted. All POST parameters are grabbed and an SQL update statement is being sent to the database. The user is then sent back to where he came from.
Creating new MySQL data using PHP
Fortunately you can use the same code as above for new comics to be inserted. Just remember that there are no pre-selections and no current values of any kind. Especially you will not be able to print a current ID for the comic, since there is none yet. It will be generated as soon as you formulate your insert statement sent to the database:
<?php $function = $_GET["function"]; $comic_id = $_GET["id"]; if ($function == "new") { // see above ... } if ($function == "new_done") { $new_comic_title = $_POST["new_comic_title"]; $new_publisher_id = $_POST["new_publisher_id"]; $comic_id = $_POST["comic_id"]; $sql = "insert into COMIC values (null, '$new_comic_title', $new_publisher_id)"; mysql_query($sql); header('Location: index.php?section=comic'); } ?> |
Alright. This concludes everything a database application needs to do: reading, deleting, updating and inserting data to the database using HTML and PHP to process both input and output of form and visual elements your browser understands. It really is that simple, although your themes and plugins may enrich the data in question in various ways.
What does all that mean for you as a blogger?
WordPress is a giant database application. Written in PHP, it is able to connect and communicate to the most famous enduser database system called MySQL. It is able to process data obtained from a database to show each website visitor a clean HTML web site that his browser is able to interpret. WordPress knows two types of users: front end users and back end users. Each have different roles and privileges, yet the mechanisms of handling form inputs, processing data and delivering a HTML based response are always the same.
We hope you were able to widen your understanding of how your favorite blogging software works. Maybe you are even encouraged to repair some of theme deficiencies you may encounter yourself. If you need additional help with your installation, feel free to contact us nevertheless.
Alright, you made it. Feel free to get back to each lesson in case you get stuck. You can contact us at any time if you have further questions. Good luck! 🙂
This lesson takes you by the hand and shows which client and server side components you need and what ways exist in order to successfully build a database supported web application. We will also point out what it is that WordPress already addresses and how the contents of this lesson can help you sort out problems with your Blog.
The overall architecture
First of all, let’s take a look at the overall architecture we’re dealing with while developing:
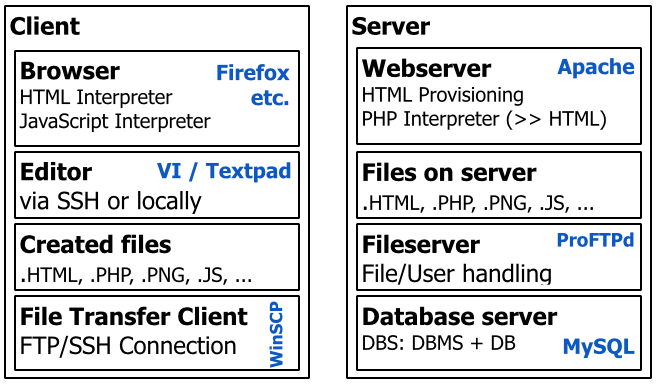
Our client provides us with a web browser that can interpret HTML and, if needed, JavaScript scripts. All that is done at the client side with no server interaction after initially receiving the files in question.
Then, still on our client, we either have an editor to create our files locally, or a terminal application which lets us develop code remotely. I will cover this in a second.
We already mentioned the files that can or often need to be created locally, e.g. HTML markup, PHP code, JavaScript code or images (JPG, PNG, etc.). All the files we’re creating locally (on the client side) need to be transferred to the server, where it can be deployed to other people’s web browsers.
That transfer from our developer client to the server is done using file transfer client tools such as WinSCP (Windows) or Cyberduck (OSX). They support different protocols such as FTP or SSH, depending on your preferred way of communication and the abilities of your server.
Now let’s take a look at how your development can take place.
The client-driven way to develop
There are various ways to develop. One way is in favor of the client. You can use a local editor application at your desktop in order to create all kinds of code, e.g. Textpad. You then need to transfer that code to the server using your file transfer client, e.g. WinSCP. That application then contacts the file service on the server you want to send files to, possibly running an ProFTPd (the counterpart of your file transfer process, which is not interesting for you unless you need to setup your own file server).

That file server then puts all of the files received to the hardware of the server, where it can be accessed by the webserver, for example — which is want we want, isn’t it 🙂
The server-driven way to develop
Another method of developing is in favor of the server. You can use a client-side application like Putty (Windows) or Terminal (OSX) to connect to your server using SSH. Once connected, you can use server-side editing tools like VI. I will cover VI handling in another article.
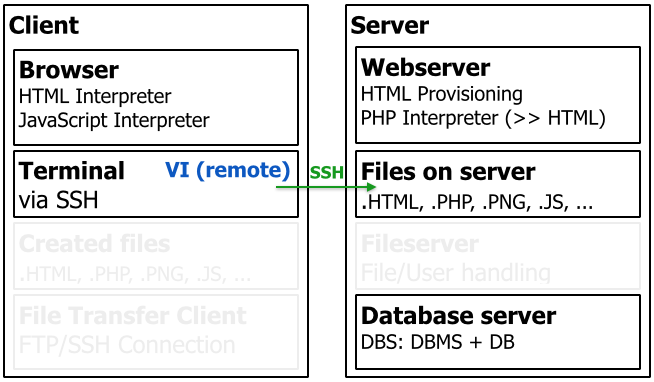
The advantage here is that you do not have to transfer any code to the server, since you’re writing files directly to the servers hard drive.
The disadvantage is that you have to maintain a stable internet connection all the time, which can be difficult in crowded WLAN environments.
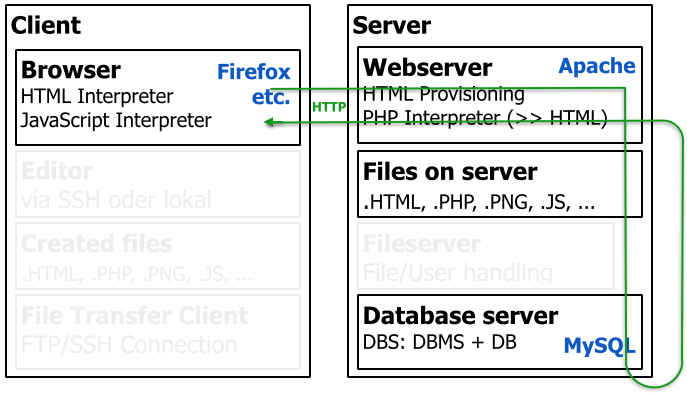
The user-server interaction roundtrip
Now let’s see what happens if you or another user tries to access files you created. The browser sends a request against a specific file, which is also the case if the address being accessed is just “www.domain.com”, since the webserver, receiving that request then searches for a file called index.php or index.html. Once that file is found, what happens next depends on the kind of file being accessed.
HTML provisioning
If the file in question is pure HTML or basic JavaScript, the server will just send the markup back to the browser where it can be interpreted.
Server-side script interpretation
If the file is of PHP or any other server side script language, the webserver needs interpreter modules installed which enables it to further process that script. Every script processing results in yet another markup output (HTML, for example) which can be interpreted by the client’s browser after transfer. The way in which that markup was created, however, is not visible by the outside world.
Server-side script and database interaction
Having a PHP or other server side script, a database can also play a role when it comes to accessing structured data, like processing login information. The webserver then needs further components to interpret DBS connections. If the script in question is PHP and the database system is MySQL, the PHP script needs both correct database connection parameters in place and a well defined SQL statement. Both of that can be thrown against the MySQL server instance which then deals with the query and sends the result set back to the webserver. The webserver then does the same as it always does, creating markup and sending it back to the client’s browser.
That would be a full roundtrip, and it is important to understand that interaction in order to successfully build a standalone web application — which is what we’re aiming at.
The WordPress approach
All of the components above are still present in a certain way with a WordPress installation. Yet there are important differences:
- A content management system like WordPress serves the purpose of separating layout and content.
- You can add texts, images and videos by uploading them to WordPress using WordPresses “Media Library” (via HTTPS instead of FTP/SSH)
- You may still edit theme files (PHP, JS, CSS) using VI (or also using manual uploads), but you can also use WordPresses own “Theme Editor” (under “Appearance”)
- You do not have to worry about *how* PHP is used to generate HTML content using the content and theme layout functions and style definitions present in the CMS.
The following scheme shows the architecture differences of WordPress in relation to a standalone website.

Please remember: You need to understand the basic principles of what is happening within a CMS, or at least within a WordPress theme, in order to be able to repair broken files and help yourself with your blog project. That is why the following chapters walk you through everything you minimally need to know about the interaction between HTML, PHP and databases.
The next lessons:
- Lesson 2: Relational Database Management System Basics
- Lesson 3: Database Modelling and Structurization
- Lesson 4: VI Editor in Unix
- Lesson 5: HTML Coding Basics
- Lesson 6: HTML form elements
- Lesson 7: Learning PHP: programming basics for output, calculation and variables
- Lesson 8: PHP for loops and conditions
- Lesson 9: How to use PHP functions
- Lesson 10: PHP GET and POST parameters
- Lesson 11: How to build a website — PHP navigational skeleton step by step
- Lesson 12: How to connect to MySQL using PHP
- Lesson 13: PHP Login Script Tutorial
- Lesson 14: Dynamic PHP based MySQL data management with HTML output
In our SEO blog we often talked about so called “onpage” criteria – things you need to take care of on your website. Within that scope, technical requirements are often addressed by a Content Management System like WordPress. However, while talking about web auditing, we also noted that there are times when you need to take things into your own hands. Code responsibility is always yours, no matter which technology you choose to use.
In short, you need to be able to fix things when they went out of order. This tutorial will give you a definite how to in order for you to understand, construct, develop and/or fix your website by teaching you how to build a standalone database supported web application using PHP and MySQL. This is meant as a complete tutorial and will take you by the hand step by step through all you need for a minimal PHP and MySQL based web application.
We will go into infrastructure basics as well as database concept foundations and step-by-step HTML notation and PHP programming exercises. However, please read this first page carefully before proceeding any further.
A Complete PHP MySQL tutorial
This is your starting point. Feel free to get back to this post every time you like.
Let’s get started right away. In order for you to grasp everything you need to know about PHP and database development, we recommend going through this tutorial step by step. The following lessons are designed to be worked through in chronological order.
- Lesson 1: Client and Server Infrastructure: File, Web, Database tools vs. WordPress
- Lesson 2: Relational Database Management System Basics
- Lesson 3: Database Modelling and Structurization
- Lesson 4: VI Editor in Unix
- Lesson 5: HTML Coding Basics
- Lesson 6: HTML form elements
- Lesson 7: Learning PHP: programming basics for output, calculation and variables
- Lesson 8: PHP for loops and conditions
- Lesson 9: How to use PHP functions
- Lesson 10: PHP GET and POST parameters
- Lesson 11: How to build a website — PHP navigational skeleton step by step
- Lesson 12: How to connect to MySQL using PHP
- Lesson 13: PHP Login Script Tutorial
- Lesson 14: Dynamic PHP based MySQL data management with HTML output
If you have doubts wether you need to understand all that, feel free to read ahead.
The idea behind modern web development
But worry aber PHP or MySQL at all? Well, ever since the concept “web 2.0” came up, the user was meant to participate in the content delivery of a modern web page. For example, a user can take part in content creation by:
- creating a blog post or a page in WordPress
- posting a comment underneith a blog post
- posting a guest book entry on someones personal website
- posting a statement to a community forum
- posting texts to a Wiki
- uploading media (images or videos) to a social network
- sharing documents with team mates in a web collaboration system
- changing attribute values of data sets in a global music library
- adding or deleting items within a geo caching record system
All of the above require data handling capabilities of the web site in question. A web site is no longer a static item delivering simple hard coded structured data via HTML. Web 2.0 web pages require dynamic data display. To achieve that, communication between the web server and a database server which delivers the ever changing data is required.

Between the ideas of delivering structured display data via HTML and managing data coming from a database system such as MySQL, PHP is used to introduce various algorithms such as loops and data sorting functions. Using databases like MySQL to hold data and HTML as a way to formulate visual markup, PHP is the binding element for both sides to understand each other.
A HTML form may present a way to input guest book data such as your name and your entry text. PHP then reads that data and passes it to the database. The database system then inserts the data received from PHP to the pre-defined database tables. Another web page can then use PHP to read the content of a specific database table, or even different tables combined, and present that data, e.g. the guest book content, including the newly created entry. PHP then not only handles the data readout, but it also generates the HTML output you desire.
Now that must all sound pretty horrible. Actually it’s not. All the concepts above will be explained in more detail using this tutorial.
PHP and database development for Bloggers
This guide is scructured in a way that it can serve as a reference sheet regarding certain source code or concept ideas even when you already know how to code. Still, this guide does not require you to have any skills to start using it. Every blogger will have the benefit in understanding all that is tought here. In fact the material in front of you was used for basic first semester University programming and database classes — with great success and feedback.
Understanding how modern web technologies like PHP and MySQL work together is essential to grasp the basics on how a Content Management System like WordPress functions – and how to fix themes or plugins when things are broken.
Whenever you need an overview, feel free to get back to this post. Have fun! 🙂
We have often talked in our SEO blog about the various levels on which a sustainable SEO methodology applies in order to present high-quality websites to our own audience (and thus also Google). In addition to legal requirements, a clean content structure, speed, security and backlinks, one area is very often neglected: the clean technical structure of your own website.
What does the technical structure mean?
Every website has to deliver HTML code to the visitor’s computer so that it can be displayed by a browser. This HTML code is subject to conventions, the web standard defined and continuously developed by the World Wide Web Consortium (W3C).

If a website deviates from these conventions, it is up to the browser to recognize and correct these errors. Every browser is developed differently here. Google’s Chrome does an excellent job of optimizing even gross violations of the HTML code supplied before the website is displayed in the browser. Firefox and Safari are similarly strong here, Microsoft’s browsers are a bit behind here.
As an SEO, you may be wondering why all of this should be relevant to you. After all, you don’t write your website as static HTML, but use a content management system like WordPress to have your HTML code delivered to you. We will now go into this further.
The pitfalls of technical cleanliness of WordPress websites
Anyone who uses a content management system (CMS) like WordPress to provide their website is often led to believe that the technology is 100% covered. After all, it is the job of a CMS to separate technology and content so that you only have to take care of the content.
Unfortunately this is not correct. This is due to the fact that the CMS provides a website on the themes provided by third parties. The content created by the operator is put into the mold of these themes, enriched and optimized using various plugins, and in this way returned to the visitor’s browser via various, multi-layer PHP control structures and database access as the end result “website” in the form of the final HTML.
The CMS itself may work cleanly here, and your own content may also be of high quality. But SEOs around the world trust the technical integrity of the themes and plugins they use too much. But it is not for nothing that there are not only updates for the CMS, but also regular updates for the themes and plugins used.
Keep your CMS as well as your themes and plugins up to date. Use child themes to adjust the theme. Before every update, create a backup of web space and all database content.
But even if the CMS, themes and plugins are up to date, they do not necessarily have to work together optimally. The following problems result from the nature of the matter:
- Compatibility problems (themes and plugins with each other, but also themes and plugins with CMS and / or PHP and MySQL versions of your web and database server)
- Version conflicts (mostly between differently mature themes and plugins but also between themes / plugins and the CMS version)
- New bugs in all further developments of CMS, themes, plugins, PHP and MySQL releases
All of this ensures that every WordPress project can show severe deficits in the technical structure at a certain point in time. This leads to the need for repeated audits of every website project.
Check your website regularly with a web auditor, as changes to the technical structure can occur with every update on your website.
What is the aim of a web audit?
An audit is a tool from quality management. Each audit checks existing technology and / or processes against previously defined guidelines and requirements.
In a web audit, the requirements are not defined by SEO or Google, but by the World Wide Web Consortium (W3C). The fulfillment of these guidelines is checked by Google as a quality feature of the website provided by SEO and is included in the ranking. Technical cleanliness is therefore a direct criterion for better placement of a website on Google.
A web audit examines the following general factors in particular:
- Doc-Type of the website
- Contents of the robots.txt
- Existence of a sitemap
Furthermore, SEO-relevant content can be checked:
- Title of a subpage
- Length of the title
- Meta description of the subpage
- Length of the description
Requirements for mobile optimization and ergonomics can also be checked, which can also have an impact on SEO optimization, including:
- Number of images without an ALT attribute
- Existence of a viewport specification
Furthermore, there are security-related requirements that should also be met in the modern web, including, for example:
- SSL encryption
- Existence of a content security policy
- Existence of a referrer policy
Finally, Whois data from your own website and the data from the W3C validator can be transferred directly to the audit.
SERPBOT Web Auditor
SERPBOT addresses the examination of all these requirements in the SERPBOT Web Auditor, which you can use free of charge as a registered user. Additional tests with added value, which are associated with costs on our side, are available to all PRO users.
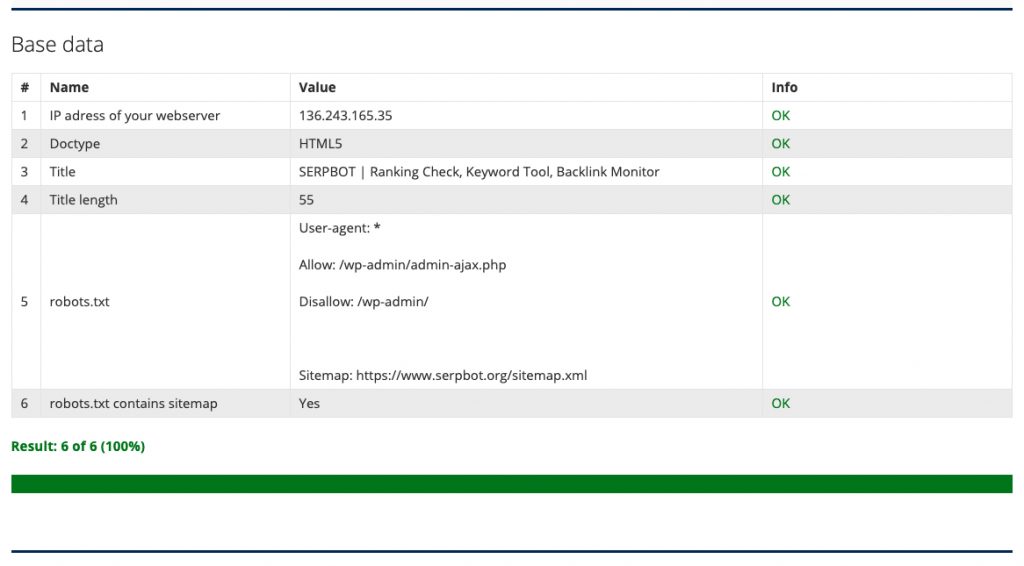
Excerpt of SERPBOT Web Auditor module
The conclusion Web Audit
Every modern website is delivered using a CMS. This is where the CMS and the themes and plugins used work together. Each of these components has different versions at different points in time, which work together differently with one another.
This is increased by new PHP and MySQL versions, which provide new functions and do away with old ones, so that there is a real competition for every CMS, theme and plugin manufacturer to keep the website functional. This not only creates technical challenges, but also human errors that have to be compensated for in new versions.
This highly complex interplay of technical changes and dynamically generated websites leads to a direct necessity: the regular audit of your own website – a web audit. With the Web Auditor, SERPBOT therefore offers a strong ally for your web projects.