This lesson gives a step-by-step description on how to dynamically read data coming from a MySQL database and how to both visualize and edit that data using HTML table and form markup. This brings everything together that we have discussed in previous lessons. It is also what WordPress does to provide the full technical cycle of a user’s visit from his initial request to receiving the final HTML result in his browser.
How our data management markup will look like
Let’s assume we want to build a Comic management database application handling data like this:

If a user clicks “Delete” the entry will be removed from the database accordingly.
If a user clicks “Edit” he will see a form like this:

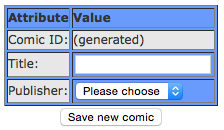
Finally, if a user clicks “Create new comic” he will see a form like this:
This article will cover everything technically necessary to develop what you see above. However I will not go into visual styles here.
Database prerequisites
Let’s take a look at the database tables we need to achieve this.
Database table COMIC
Let us assume that ID and Name are both direct attributes of a Comic, and Publisher is a foreign key ID of another table called Publishers.
| ID | Comic_Name | Publisher_ID |
|---|---|---|
| 7 | The Incredible Hulk | 0 |
| 9 | Superman | 1 |
Database table PUBLISHER
Then table Publisher will have to look like this:
| ID | Publisher_Name |
|---|---|
| 0 | Marvel |
| 1 | D.C. |
With those two tables present, what do we need to program?
Reading MySQL data using PHP
As discussed previously in this PHP MySQL tutorial, we can connect to the database and use the following code to read data coming from MySQL using PHP WHILE loop inside a content-start.php surrounded by header and footer as discussed previously:
<?php echo "<table>"; $stmt = mysql_query("SELECT ID, Comic_Name, Publisher_Name from COMIC, PUBLISHER where COMIC.Publisher_ID = PUBLISHER.ID order by COMIC.Title"); while ($row = mysql_fetch_row($stmt)) { echo "<tr>"; for ($j = 0; $j < 3; $j++) { // we're expecting three attributes echo "<td>".$row[$j]."</td>"; // gives the current item of the current attribute } echo " <td><a href="index.php?section=comic&function=edit&id=$row[0]">Edit</a></td>"; echo " <td><a href="index.php?section=comic&function=delete&id=$row[0]">Delete</a></td>"; echo "</tr>"; } echo "<table>"; echo "<a href="index.php?section=comic&function=new">Create new comic</a>"; ?> |
However there are a few things new here:
- We’re no longer simply echoing pure database information, but we’re using HTML table markup output. That output is generated by PHP whereas a table is opened up outside the WHILE loop, a table row tag is opened within each WHILE loop cycle and a table column tag is opened within each FOR loop cycle.
- We’re joining two database tables with one another using the SQL statement above.
- We’re extending the attribute columns by two additional columns carrying HTML links pointing to more magic.
Deleting MySQL data using PHP
If a user clicks “Delete”, we have to somehow send a SQL delete statement to the database.
The first step is already done. Looking at the code above, we see that the link with the anchor text “Delete” already possesses the ID of each comic to be deleted. That leaves us with the following tasks:
- Grabbing the transported ID
- Formulating and sending the right statement to the database
- Heading back to the previous page
Since the link says “index.php?section=comic&function=delete&id=$row[0]” we first need to remember where we are right now. I still assume that you’re using the navigational skeleton as described here. If that is the case, you already solved the problem of directing the user to the comic section, whereas a specific file is being loaded, let’s say content-comic.php.
Inside that file, we now have to grab an additional parameter called “function”, since we want to distinguish between creating, editing and removing comics. Secondly, we need to grab the transported ID. We do both as described within the inter-script parameter article:
<?php $function = $_GET["function"]; $comic_id = $_GET["id"]; if ($function == "delete") { $sql = "delete from COMIC where ID = $comic_id"; mysql_query($sql); header('Location: index.php?section=comic'); } ?> |
That was the easy part.
Editing MySQL data using PHP
Now things get a little more complex. While we can use the same mechanism as described above to grab the function “edit”, we have to do a little more stuff in order to give each user the opportunity to modify the information.
First of all, a user wants to see the current information, which makes it easier for him to change them 😉 That is why we’re selecting all information belonging to the current comic ID. Afterwards we’re printing that information either without text field (ID, unchangeable), inside a text field (text information like the comics title) or inside a dropdown menu (comic publisher, but with a pre-selection for the current publisher).
Additionally the current comics ID is held within a hidden field.
Study the code below which does exactly that:
<?php $function = $_GET["function"]; $comic_id = $_GET["id"]; if ($function == "edit") { echo "<form action='index.php?section=comic&function=edited' method='POST'>"; echo "<table>"; $stmt = mysql_query("select ID, Comic_Name, Publisher_ID, Publisher_Name from COMIC, PUBLISHER where COMIC.Publisher_ID = PUBLISHER.ID and COMIC.ID = $comid_id"); while ($row = mysql_fetch_row($stmt)) { echo "<tr>"; echo " <td>ID</td>"; echo " <td>".$row[0]."</td>"; // not changeable echo "</tr>"; echo "<tr>"; echo " <td>Title</td>"; echo " <td><input type='text' name='edited_comic_title' value='".$row[1]."'/></td>"; // changeable echo "</tr>"; echo "<tr>"; echo " <td>Publisher:</td>"; echo " <td><select name='edited_publisher_id' type='text' value=''/> <option value='$row[2]'>$row[3]</option>"; $sql = "select ID, Publisher_Name from PUBLISHER where ID not like $row[2] order by ID asc"; $stmt_inner = mysql_query($sql); $i = 0; while ($row_inner = mysql_fetch_row($stmt_inner)) { $j = 0; $ID_Publisher[$i] = $row[$j]; $j++; $Title_Publisher[$i] = $row[$j]; echo " <option value='$ID_Publisher[$i]'>$Title_Publisher[$i]</option>"; $i++; } echo " <td>"; echo "</tr>"; } echo "</table>"; echo "<input name='comic_id' value='$comic_id' type='hidden'/>"; echo "<input name='Save' value='Save' type='submit'/>"; echo "</form>"; } if ($function == "edited") { $edited_comic_title = $_POST["edited_comic_title"]; $edited_publisher_id = $_POST["edited_publisher_id"]; $comic_id = $_POST["comic_id"]; $sql = "update COMIC set Comic_Name = '$edited_comic_title', Publisher_ID = $edited_publisher_id where ID = $comic_id"; mysql_query($sql); header('Location: index.php?section=comic'); } ?> |
You notice that there is also a comparison for variable “function” against the string “edited”. The variable function carries that string when the form that held all previous input fields was submitted. All POST parameters are grabbed and an SQL update statement is being sent to the database. The user is then sent back to where he came from.
Creating new MySQL data using PHP
Fortunately you can use the same code as above for new comics to be inserted. Just remember that there are no pre-selections and no current values of any kind. Especially you will not be able to print a current ID for the comic, since there is none yet. It will be generated as soon as you formulate your insert statement sent to the database:
<?php $function = $_GET["function"]; $comic_id = $_GET["id"]; if ($function == "new") { // see above ... } if ($function == "new_done") { $new_comic_title = $_POST["new_comic_title"]; $new_publisher_id = $_POST["new_publisher_id"]; $comic_id = $_POST["comic_id"]; $sql = "insert into COMIC values (null, '$new_comic_title', $new_publisher_id)"; mysql_query($sql); header('Location: index.php?section=comic'); } ?> |
Alright. This concludes everything a database application needs to do: reading, deleting, updating and inserting data to the database using HTML and PHP to process both input and output of form and visual elements your browser understands. It really is that simple, although your themes and plugins may enrich the data in question in various ways.
What does all that mean for you as a blogger?
WordPress is a giant database application. Written in PHP, it is able to connect and communicate to the most famous enduser database system called MySQL. It is able to process data obtained from a database to show each website visitor a clean HTML web site that his browser is able to interpret. WordPress knows two types of users: front end users and back end users. Each have different roles and privileges, yet the mechanisms of handling form inputs, processing data and delivering a HTML based response are always the same.
We hope you were able to widen your understanding of how your favorite blogging software works. Maybe you are even encouraged to repair some of theme deficiencies you may encounter yourself. If you need additional help with your installation, feel free to contact us nevertheless.
Alright, you made it. Feel free to get back to each lesson in case you get stuck. You can contact us at any time if you have further questions. Good luck! 🙂